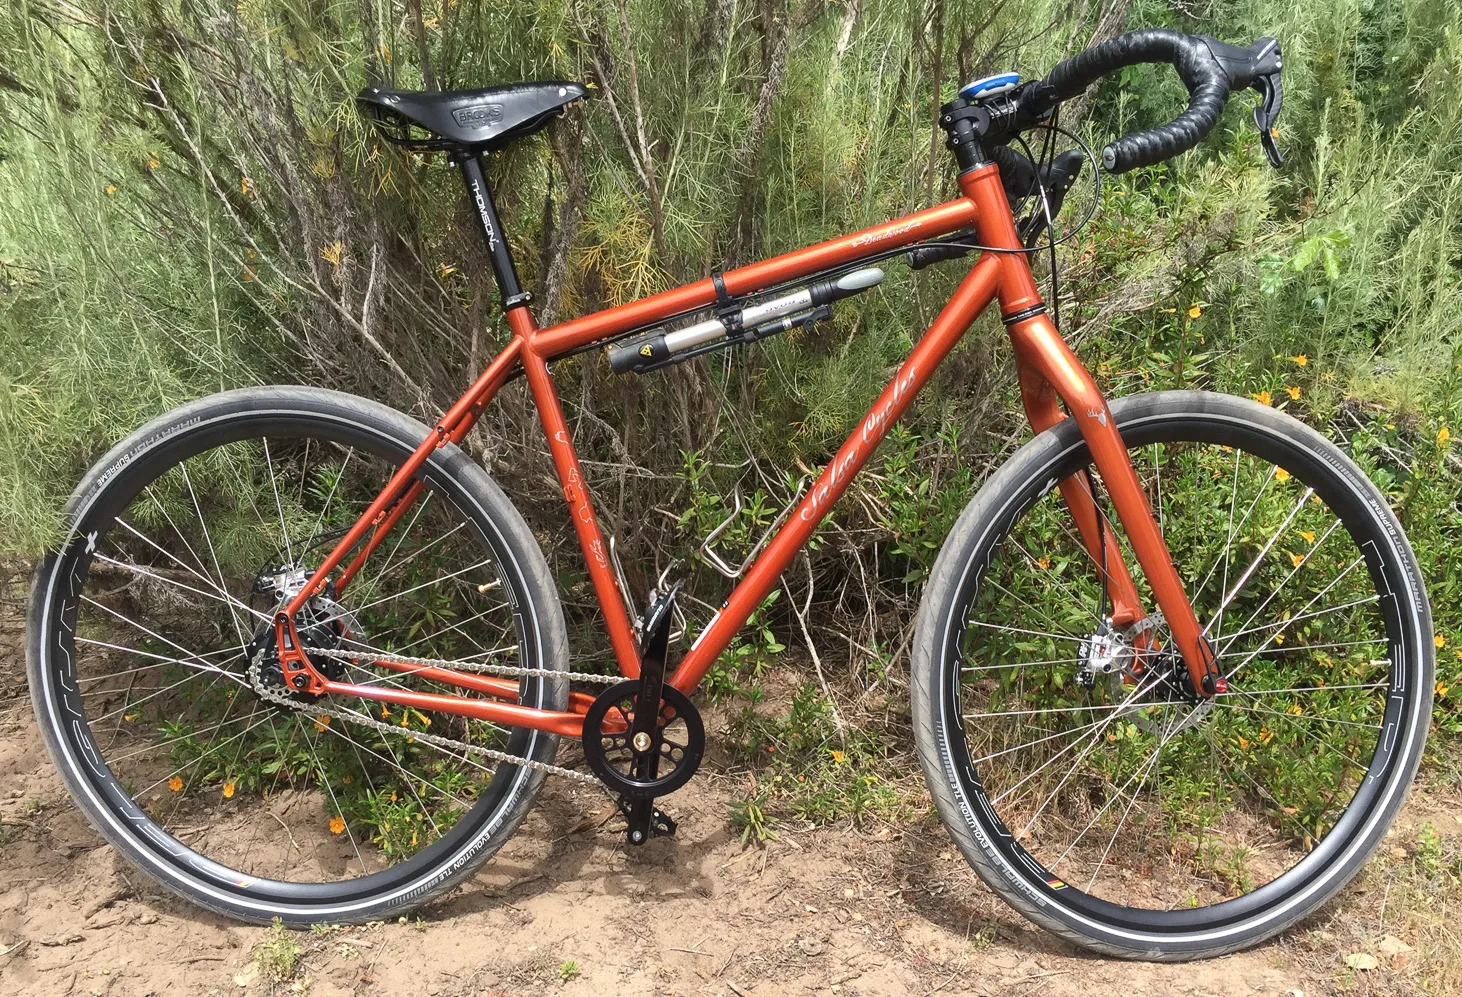
Salsa Deadwood Rohloff Build
Mike Kock · May 26, 2017
History
Like most people, I started riding a bicycle as a young kid. I rode my bike to school all the way through junior college and I didn't even get my driver's license until I was 20. I used it for my paper route and started mountain biking in Fort Ord in the late 80s when you still had to avoid the M.P.s! Then at the end of high school I got my first "good bike," a Trek 930 mountain bike. With that bike I started doing 20+ mile rides.
The Problem
However, that first Trek started a bad trend for me. Riding bikes that are too small for my 6'4"+ height. Sometime after college I decided to get a road bike since I was more interested in riding to different places than mountain biking. I picked one of the biggest frames I could find, a 64cm road frame. Even with an uncut steerer tube I still had over a 3 inch drop from the seat to the tops of the handlebars. That wasn't terrible but as my rides got up to the 50-100 miles range my hands and lower back would always be the first things to get sore.
The Solution
So with that problem the only solution is buying more bikes! Now I considered going custom however that tended to be very expensive with long wait times or having to travel long distances. One of the other things I wanted to get into was more long distance riding with some light touring. I was intrigued with the idea of using a Rohloff Speedhub as well.
I actually started considering the Specialized AWOL. It had the ability to run a Rohloff, larger tires, carry a load, and it had a taller headtube and more upright posture than a traditional road bike. However their largest size frameset was out of stock and they weren't expecting new ones for about 9 months! I also looked at building up a Salsa Fargo frameset in XL size. Same general capabilities and size as the AWOL but they were out of stock as well. But new ones were arriving in a couple of days. I put down a deposit but by the time they became available they were all accounted for already and the next shipment wasn't for another 6 months! I never thought it would be so difficult to give a company by business!
I was working with Spokesman Bicycles in Santa Cruz and they mentioned there was a single 2016 Salsa Deadwood XL frameset still available. The model was discontinued after one year but it was almost exactly the same as a Fargo but with the ability to handle 3" tires and I could get it at the same price as the Salsa. Good enough for me!
Build Decisions
Next started the long process of figuring out all the parts for the build. There are so many options to choose from and with cycling manufacturers coming up with new parts and "standards" every year compatibility is always a concern as well. So this is what I settled on.
Frameset
- Salsa Deadwood XL – Includes a full carbon fork and steerer tube.
- Salsa Alternator 1.0 Boost Reduction Kit – This part is basically 2 3mm plates to convert the 148mm rear triangle spacing to be compatible with 135mm quick release hub. This part is still on backorder. Does this part actually exist? I see it mentioned on the web but always with a "available in …" qualifier that never comes true. Last I was told was July 2017. In the meantime I just run without it. The steel frame seems flexible enough to make up the 3mm on each side.
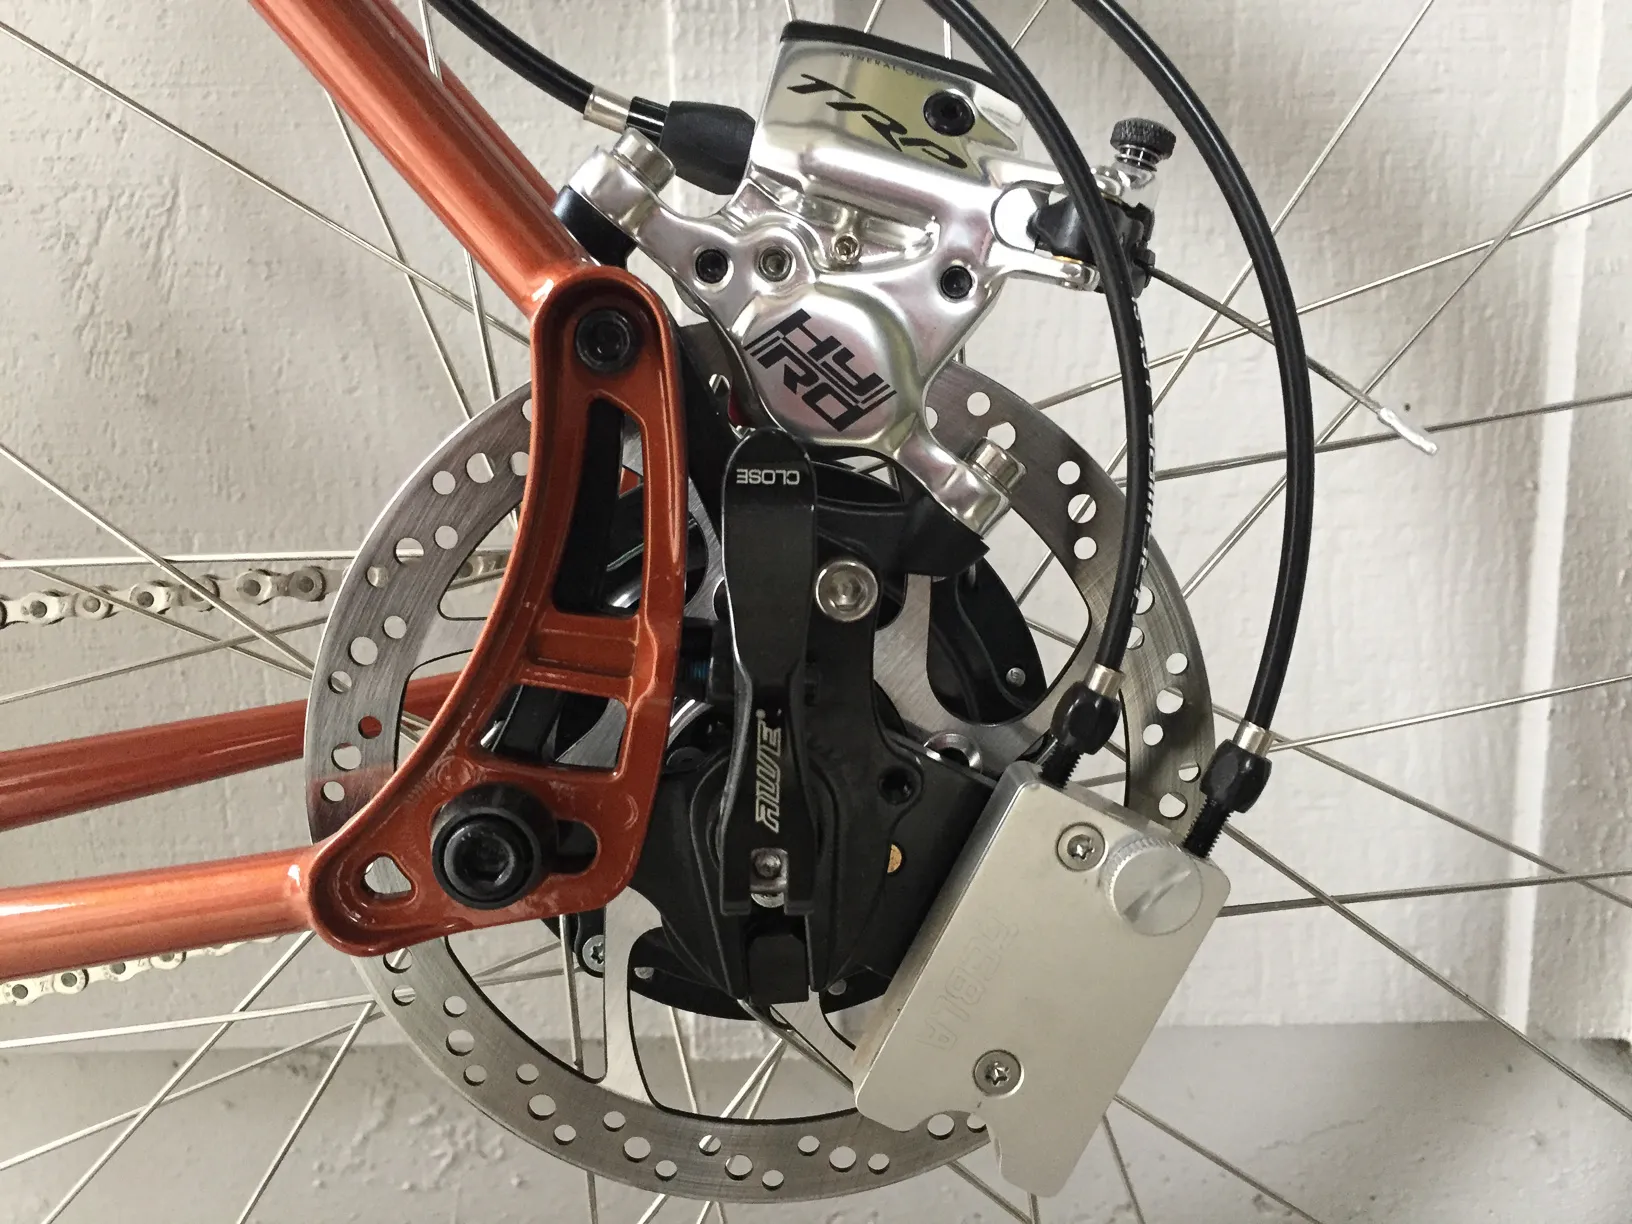
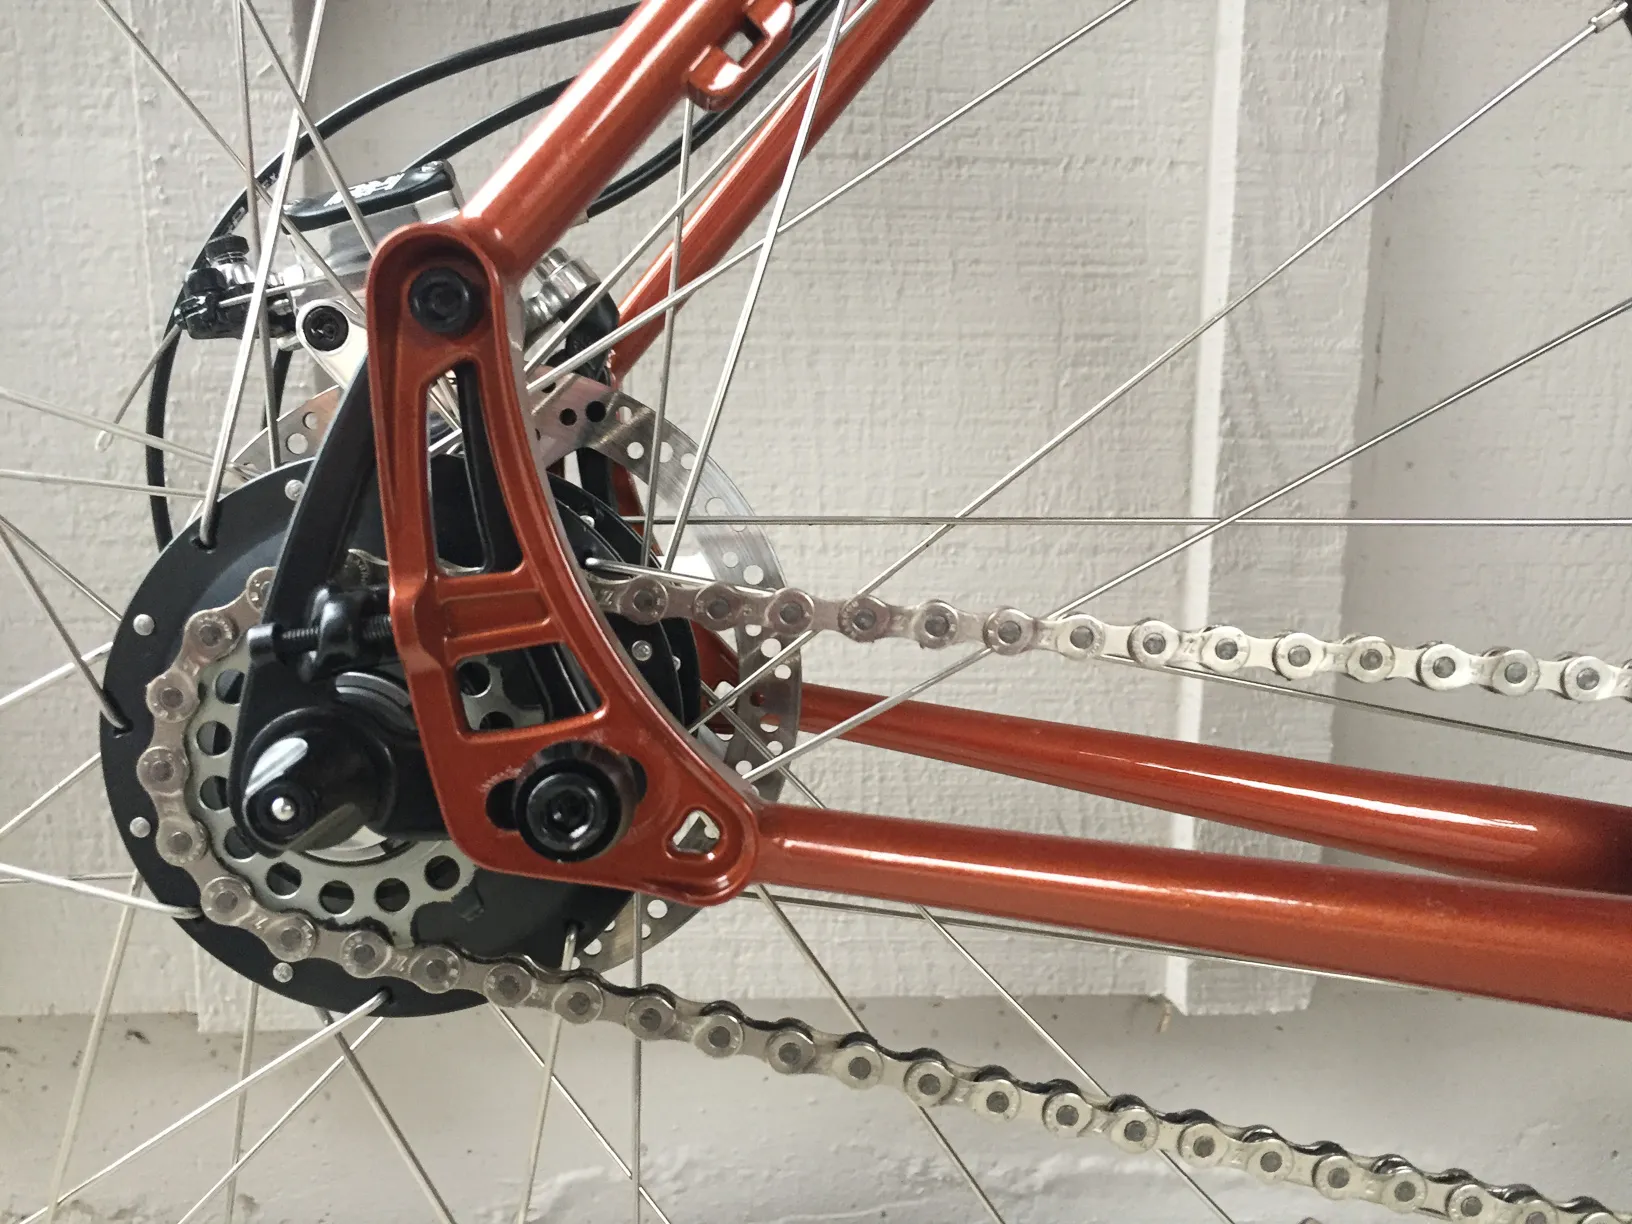
- Salsa Alternator Plate Left Rohloff OEM1 – This is the alternator plate needed to support the Rohloff hub in the rear dropout on the non-drive side.
- Salsa Alternator Plate Right QR Single Speed – This is the alternator plate needed to support the Rohloff hub with quick release on the drive side.
- Water bottle cages – Need to hydrate!
- Small zip ties – needed to hold brake and shifter cables onto frame braze on cable guides.
Drivetrain
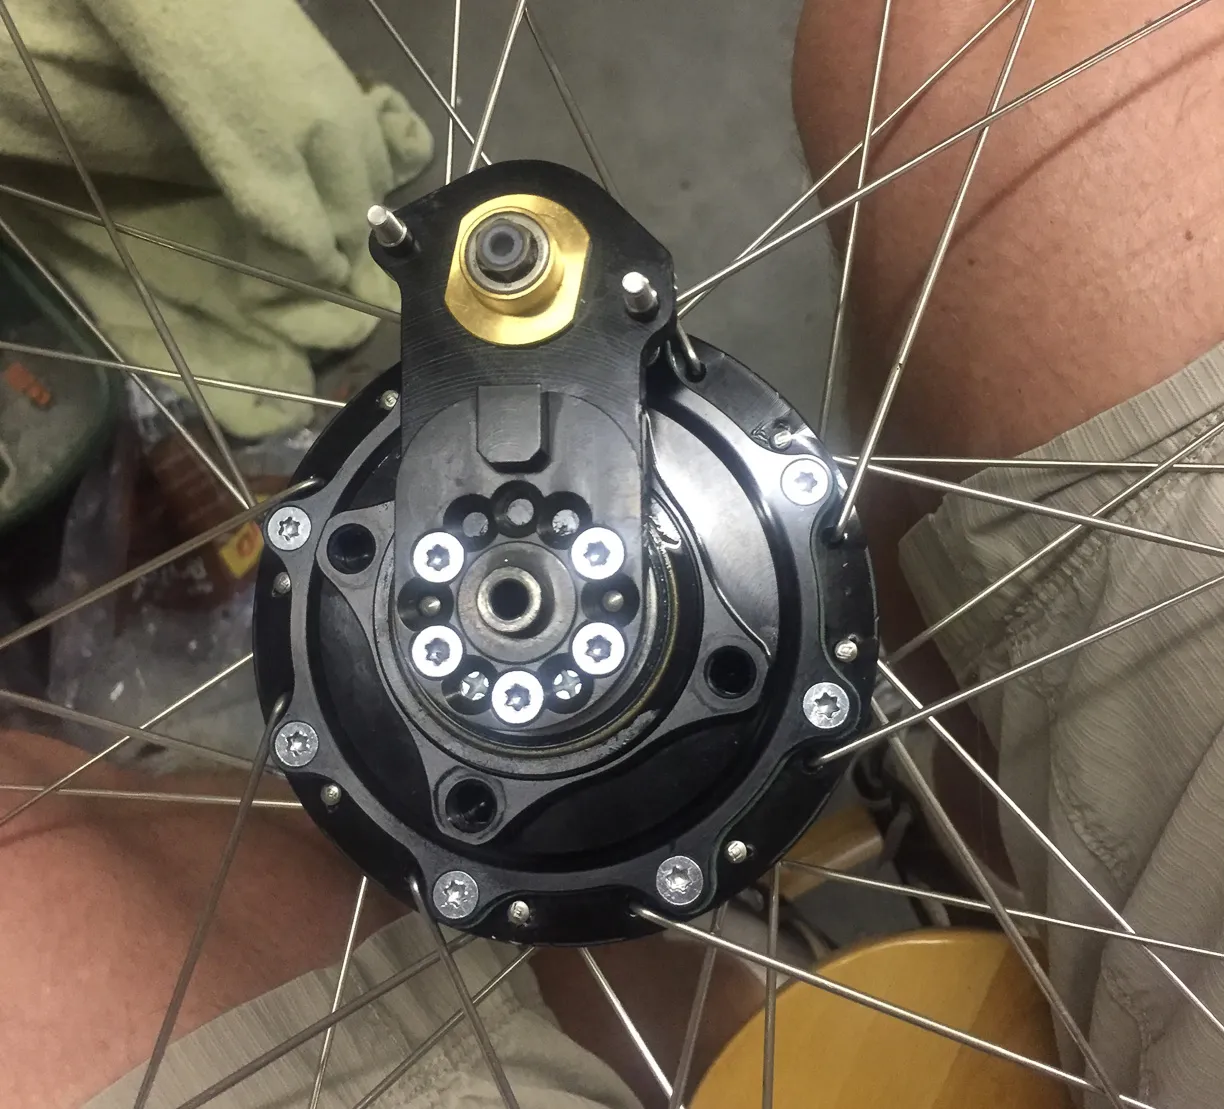
- Rohloff Speed Hub 32 hole black – 14 speed internal gear hub (IGH).
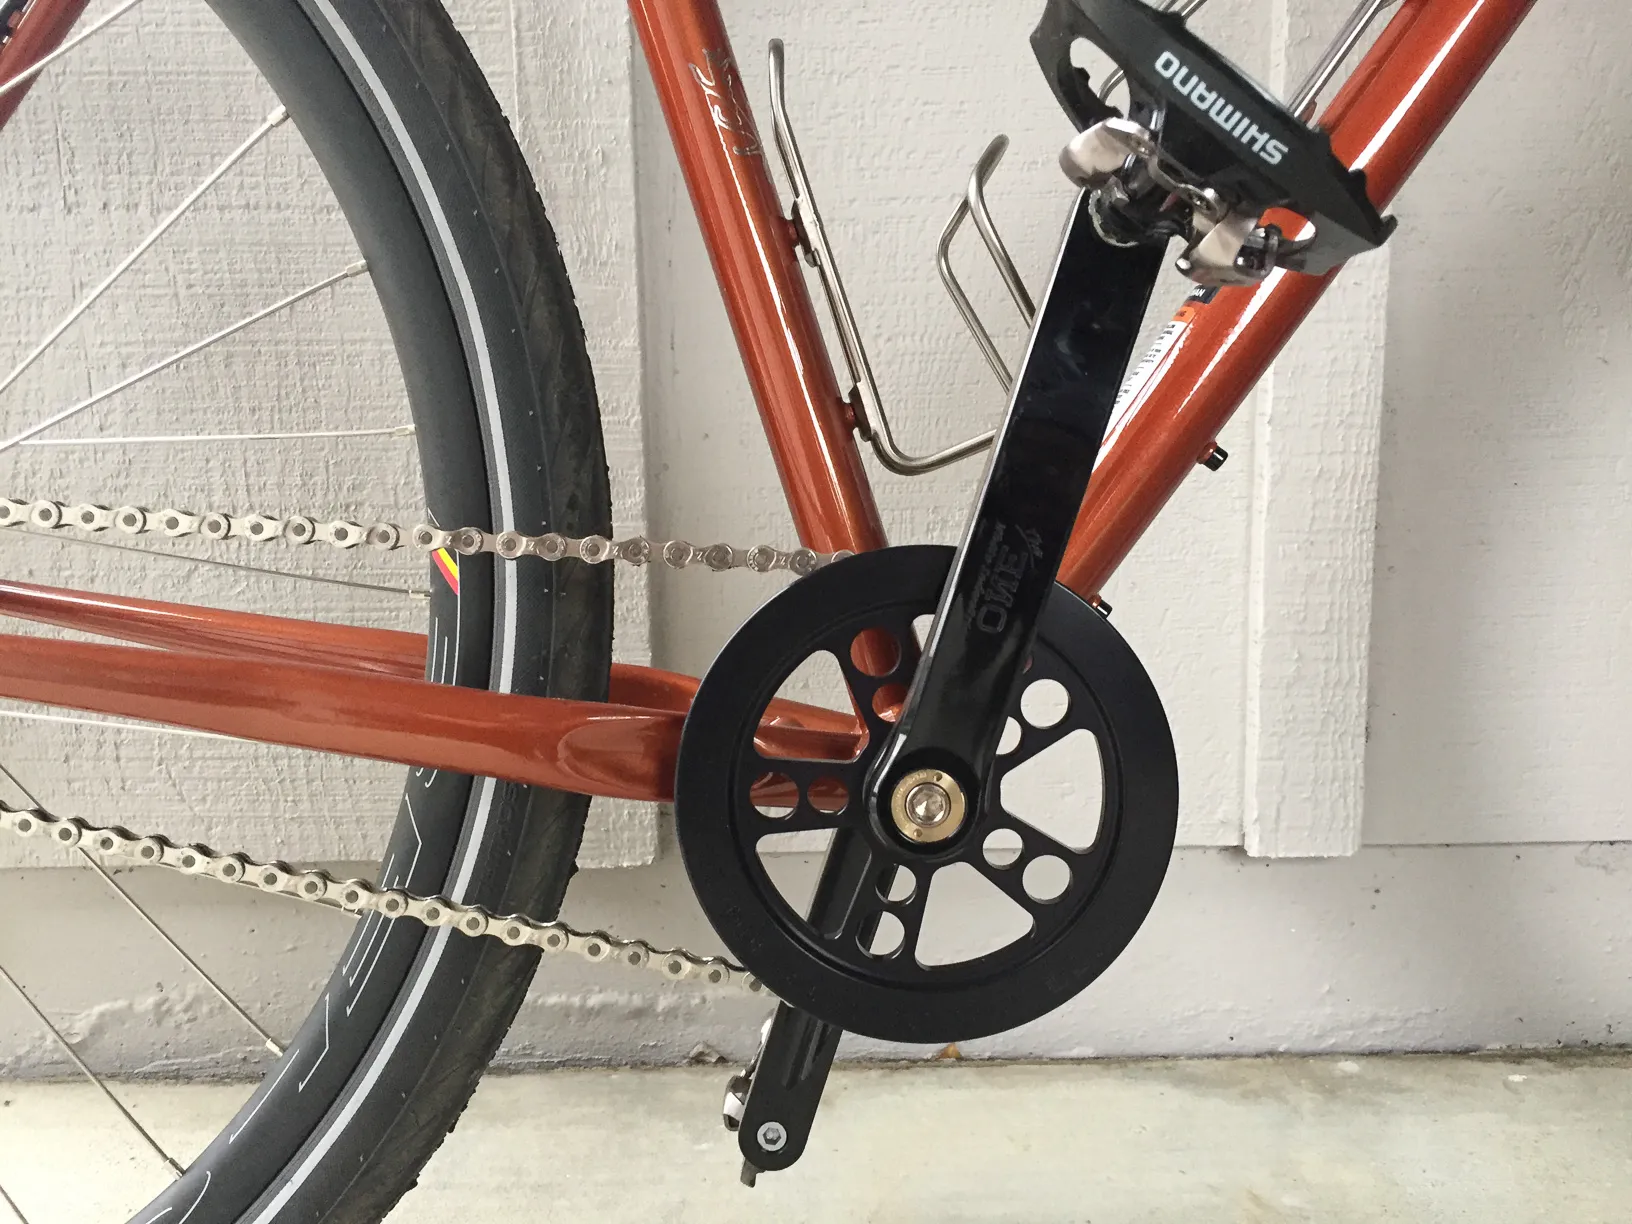
- White Industries Eno Crank Set 175 SS/Mtn VBC Black 34 tooth – I wanted a single speed square taper crank set that uses a 6,7,8 speed chain. There weren't a lot of options out there.
- Phil Wood BB 68 x 127.5mm.
- Phil Wood BB Cups Stainless English 68mm.
- KMC Z8 Chain 1/2" 3/32" 116 Links Silver – I originally ordered a KMC X1 chain but when I went to connect it I realized it was a handful of links too short! At some point they reduced the number of links for that chain to 96. They still use the same box just with a 96L sticker over the original 100+ number. Anyway, the 6,7,8 speed type chains are cheap and long lasting compared to the newer super narrow 11 speed chains.
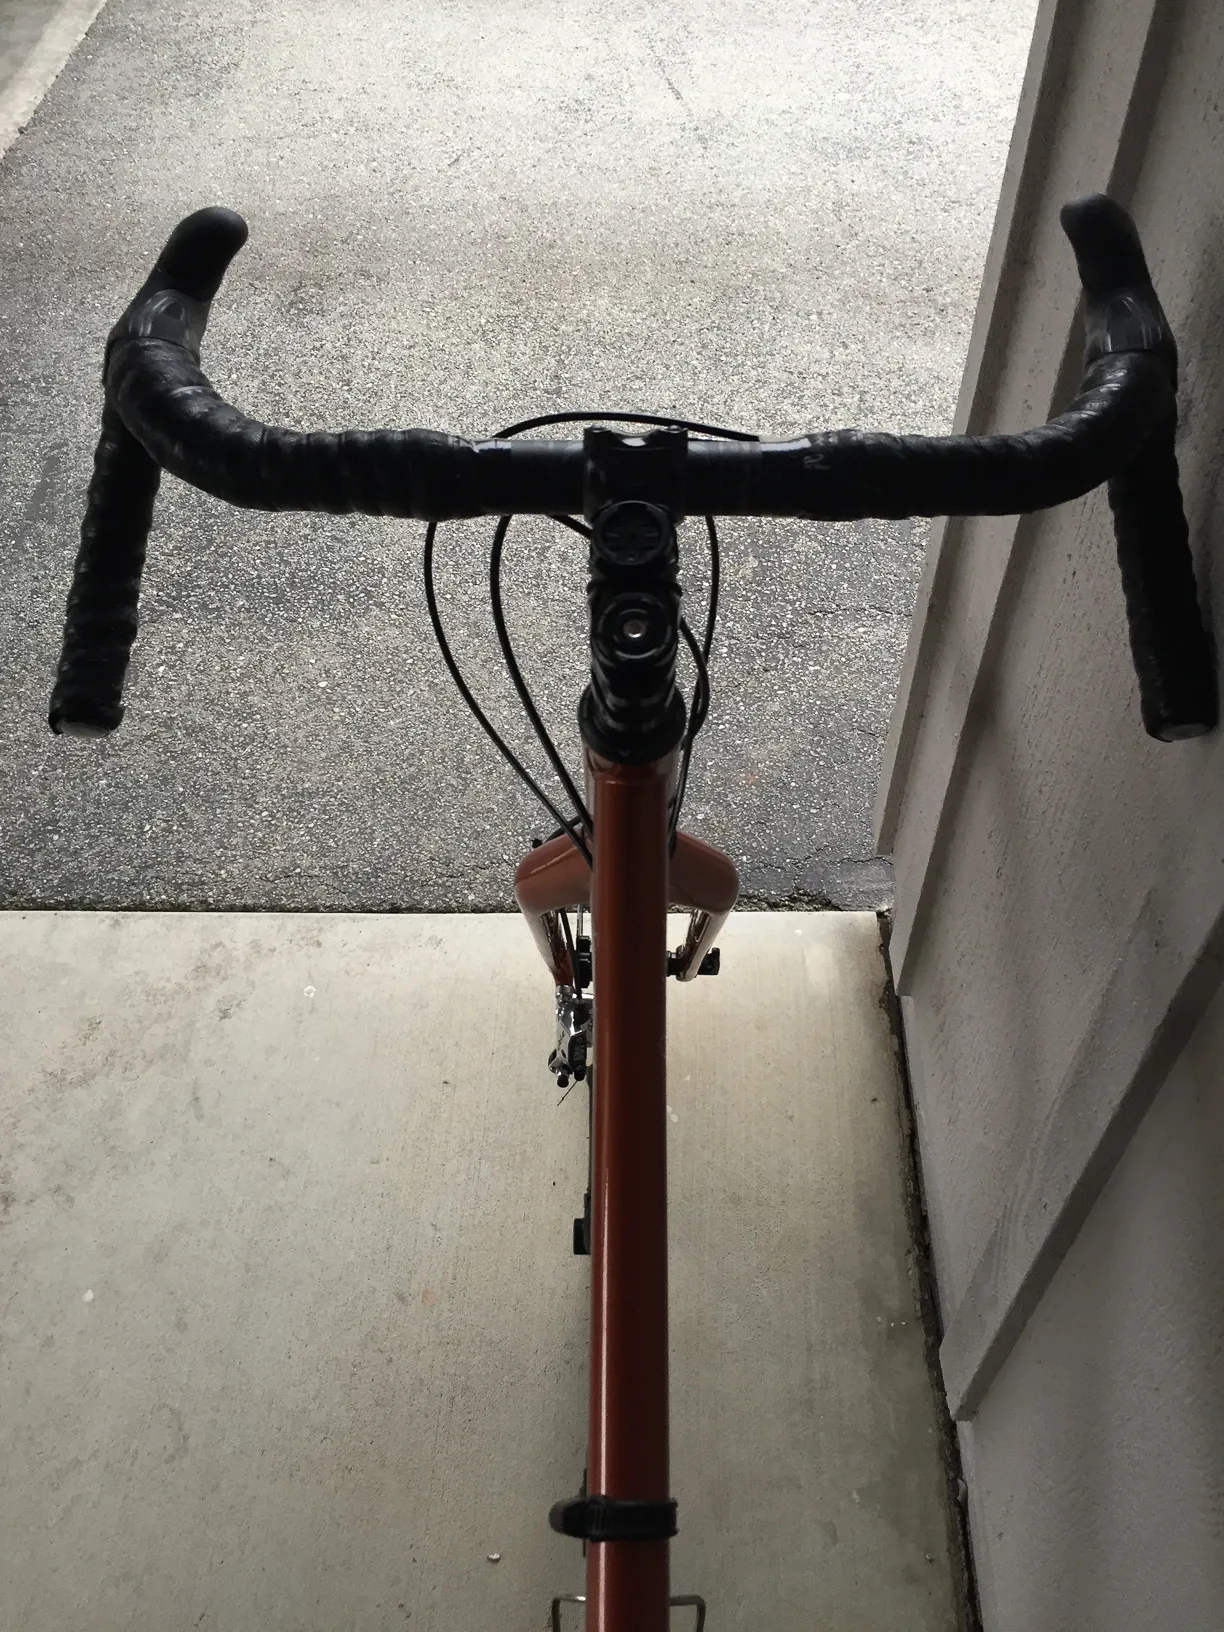
- Campagnolo Chorus 11- Sp Ergopower Shift Levers Carbon - I prefer Campy shifters so I wanted to stay with them.
- Gebla Rohbox – This unit allows the use of Campy or SRAM index shifters with a Rohloff instead of the included twist shifter (which is the wrong size for road handlebars anyway).
- Campagnolo Shift Cable Kit - JAGWIRE Slick Stainless Steel – The shifters came with cables but the cable meant for the front derailleur was too short to reach all the way back to the Rohbox on the Rohloff hub.
- Jagwire 4mm Derailleur Housing w/ L3 Liner, Roll/25 Black - Shifter included shifter housings are meant for road bikes which usually run bare cable for much of the length of the frame while this frame is setup like a mountain bike assuming cable housing runs entire length.
- 2 of Jagwire Sport Brake Cable Slick Stainless 1.5x2750mm Campagnolo Tandem – The brake cables that came with the Campy shifters were too short because they assume brakes mounted at top of each wheel on a short wheelbase bike instead of disc brakes mounted at hub on a long wheelbase bike. Tandem cables gave me a cable that would reach all the way to the back disk brake.
- Jagwire Cog Brake 30' Housing 5mm with L3 Liner, Black – The shifter included brake housings are meant for road bikes which usually run bare cable for much of the length of the frame while this frame is setup like a mountain bike assuming cable housing runs entire length.
- Shimano PD-A530 SPD Dual Platform Bike Pedal – SPD for long rides, platforms for around the neighborhood in normal shoes.
Wheels
- HED Belgium Plus 25mm Disc Rim, 32h Black – Strong US made tubeless rim.
- DT Competition Spoke Butted Silver – 64 spokes plus a couple of extras. I had the shop do all the spoke length measurements for me.
- Brass Nipples – 64 nipples plus a couple of extras.
- Schwalbe Marathon Supreme HS 469 HS MicroSkin Tubeless Easy Cross/Hybrid Bicycle Tire - Folding (Black-Reflex - 700 x 40) - Tubeless tire that can handle some rough and dirt surfaces.
- Stans No Tubes Yellow Rim Tape 10 Yards x 21mm.
- Stans No Tubes Universal 35mm Mtn Valves.
- Orange Seal Endurance 4oz w/ Injector.
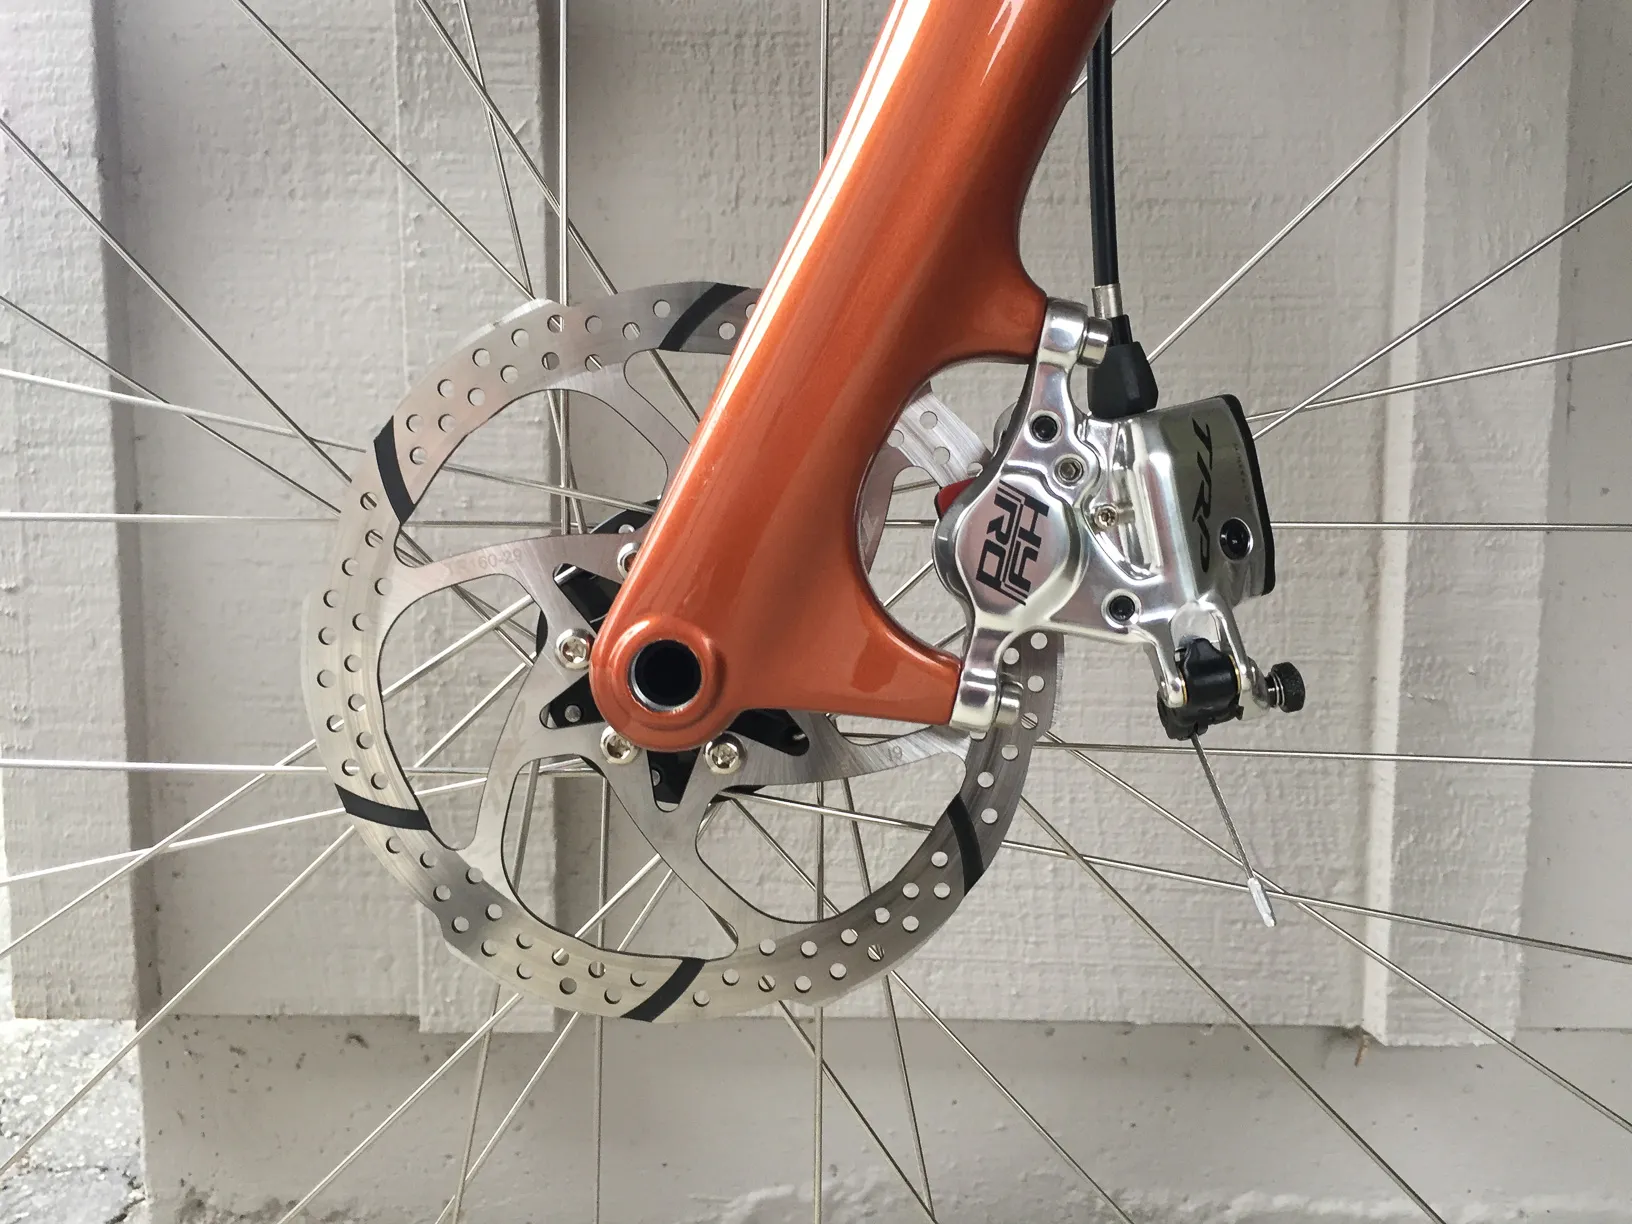
- TRP HY/RD Cable-Actuated Hydraulic Disc Brake 160mm Rotor.
- Rohloff Speedhub Rotor Shim/Hayes/Avid – The Rohloff hub has 4 holes for the disc rotor bolts so requires a different 160mm rotor than comes with the brakes.
- Son 28 15 Disc front hub – I eventually want to be able to run a light and possibly keep my phone charged as well on longer rides.
- AWE® 6061 Alloy Quick Release Skewers Black – I needed a long QR skewer for the rear wheel.
- Slime 23042 Presta to Schrader Valve Adapter – This allowed me to use an air compressor to seat the tires on the rim. They are always good to have on the road too in case you want to use gas station air.
Steering
- Cane Creek 40 ZS44/28.6 / EC49/40 Tapered Headset Tapered Steerer Black.
- Salsa Cowchipper Drop Bar 31.8 44cm.
- Thomson X4 Stem Mountain 31.8 90mm 10 Degrees Black 1-1/8" Threadless.
- Bike Headset Spacer 6Pcs Aluminum Alloy Bicycle Stem Headset Spacer Fit 1 1/8-Inch Stem. Compatible with MTB Bike Road Bikes 2mm 3mm 5mm 10mm x 3 (Black) - I needed an assortment of spacer sizes in order to leave at least 5mm of spacers above top of carbon steerer tube (requirement) while adding a little extra to make room for top cap to clamp down without running into compression plug top. I ended up with about 22-23mm of spacers under the stem and 10mm spacer above the stem.
- Lizard Skins DSP Bar Tape 3.2 Black - I would probably go with something a little thinner.
Sitting
- Thomson Elite Seatpost 27.2 x 410mm Black.
- Brooks Saddles B17 – I have been happy with Brooks Saddles on my bikes for a long time.
The Build
The total time needed for the build was much longer than expected. This was my first complete bike build so there was some learning as I went. Also sometimes I would get to a particular step and realize I had the wrong part, I had forgotten to order a particular part or I didn’t have a particular specialized tool. In the end everything worked out though.
The Wheels
I started the build by building up the wheels by hand. The front wheel uses 32 spokes in a 3x pattern and the rear wheels uses 32 spokes in a 2x pattern as recommended by Rohloff. I followed the directions in my 15+ year old Barnett's Manual: Analysis and Procedures for Bicycle Mechanics (4 Volumes) books. It is a tedious process but if you can follow directions, have the right tools (truing stand, spoke wrench, tension meter) and a little patience then it is completely doable. I also used the Park Tools Tension App (http://www.parktool.com/wta) to help record the tension readings and get the spoke tension within a 10% variance.
The Headset
Having never put together a carbon steerer based form and integrated headset, it took me some time to figure out how it all went together. It came down to install compression plug and torque to spec. Then add in headset bearings, spacers, stem, spacers and top cap to take up the headset slack. Not too bad once you know what you are doing.
Shifting
This was an interesting challenge. The Campy 11 speed shifters have indexing build into them. The paddle pulls cable, the thumb button releases the internal ratchet down a notch. The Rohloff shifting is done in the hub with a shaft that rotates clockwise and counterclockwise to shift up and down through the 14 indexes. This is where the Gebla Rohbox comes in. It is a box that connects to the Rohloff hub which includes a gear that fits over the hex shifter shaft in the Rohloff and has a spring, a metal tab, a set screw and a block for each shifter cable. When the shifter pulls the cable, the spring compresses which causes the metal tab to engage a tooth on the gear which rotates the Rohloff shifting shaft one notch.

So in my case, I made the right shifter rotate to a lower gear and the left shift rotate to a higher gear. This matches the functions of the shifter paddles in a normal derailleur setup. Since one pad shifts down and the other shifts up, the thumb shifters serve no purpose anymore. However they still keep the shifter in the current index notch so eventually you would need to press the thumb button to get more indexes out of the shifter again. Solution, remove most of the internals of the Campy shifter. An online search will find posts saying this can be done but none detail how to do it. And finding information on disassembling modern Campy shifters is almost non-existent since they are not considered serviceable anymore (just but a new shifter instead).
So I just tore into one. Pull back the rubber hood, unscrew the one screw that holds all the parts onto the Campy shifter shaft. Oh, you will need some really tiny Torx driver for the screw (I forget the number). I started pulling stuff out trying to make sure you keep things in order to figure out what is needed or not needed. The main thing I found online was that the ratchet probably needed to be removed. But they don't show you what that piece looks like or how to do it.
So I saw a a metal disk that has about 11 teeth cut into it like a partial gear. I assumed that was the ratchet mechanism so I removed the parts up to it except for the white plastic part that the shifter cable end terminated into. That left some space and parts rattling. So in the end I removed all the parts that the screw on the end of the shaft held on except for the white plastic piece that the shifter cable terminates into and then the washer and screw that holds everything onto the shifter's shaft.
I removed the thumb shifter, the ratchet gear, some circular springs, and a large number of washers and spacers that all sat on the shaft. No loose parts and pushing the paddle still rotates the shaft which pulls the cable in the white plastic piece and the paddle still returns back to normal when let go. Super simple really once you know what to do.
After everything else on the bike was assembled it was time to run the cables to the Rohbox and install those. After figuring out the desired routing and length of the shifter cables, I started following the instructions found on their website and a YouTube video of a guy speaking German. The main problem I had here was trying to eat up some slack in the cable after already setting the shifter cable in the block and cutting the end off. I undid the set screw in the block, the cable slid out but the set screw had caused the cable to fray apart some and it was impossible to get that cable threading into the Rohbox block again since the hole is about the exact size of a perfectly wound cable. Luckily I still had my back shifter cable from the Campy shifters and I used that one with no problem.
Tires
This was my first time setting up and using tubeless tires. I did two layers of Stan's NoTubes rim tape as suggested. I had to use tire levers to get both sides of the Marathon tires over the rim. Very stiff tight fit. Tried pumping up with a floor pump and I got the tire to partially seat but not fully. 40 PSI was about the max. Then after ordering some new Schrader/Presta valve converters I tried using an air compressor. I couldn't get it past 40 PSI either which made no sense. Then I realized most of the air leak was from around the stem. I cranked down on the presta valve nut some more and then it finally seated fully around 60 PSI. It was slowly leaking air but still had a lot of air in it 15 minutes later. I deflated the tire and added in sealant and pumped up to 70 PSI and now they hold air overnight no problem. Never saw any sealant seap out but the sealant made it airtight.
The Final Verdict
So far I only have a little over 30 miles on the bike but I am pretty happy with how everything turned out so far. I still have to make some small adjustments like the angle of the shifters. Total weight ended up at 29 pounds.
The 40mm tires are way more forgiving than the 110 PSI 23mm tires I am used to. A little gravel or rocks on the rode? No big deal. They work fine one dirt paths and fire roads that aren't too beat down. Big bumps can still feel pretty hard at 70 PSI. I will have to experiment with that over time. But the general road buzz from rough asphalt is gone.
Shifting the Rohloff with the Campy shifters and Rohbox are working but are not as smooth as I would like yet. I have to push the shifter paddles a little further and harder than I would like. Hopefully I can fine toon that with taking up some more cable slack and making sure everything is lubed up correctly in the Rohbox.
Riding I gears 8-14 is very quiet and smooth. Shifts can be done while peddling and you can’t even tell they occurred other than it is a little bit easier/harder to pedal. The two major complaints I have seen regarding Rohloff hubs is the gear noise especially in the lower gears and the transition between 7-8 which defaults to gear 14 if you don’t stop pedaling. I have experienced both of those already.
Gears 1-7 are noisier than the rest with 7 being the worst. Is it a problem? I don’t think so. But it will take getting used to because at first you think something is going wrong with the gears. Most of the time is spent in gears 8-14 anyway. Only when going uphill do you need to go into 1-7.
The 7-8 transition is annoying when pedaling with some force but if you stop pedaling and shift it is fine. Again, it will take some getting used to.
So far I am very happy with how things turned out and would definitely recommend it to anyone interested in doing the same thing. It isn’t cheap but everything is working as expected. I will update this blog over time with more status updates.